Tuesday, May 31, 2011

Rhubarb Chutney

I am really not a huge fan of fruit served with hot main dishes, but rhubarb is actually a vegetable and you have to add sugar to it to sweeten it for baking, so it really can become savoury.

The word "chutney" is South-east Asian in origin and generally refers to a vegetable or fruit based condiment that is flavoured often with chili and ginger, and aromatic spices such as coriander and cumin.

There is no limit to what you can do with a chutney as they can be made from virtually any vegetable-fruit-spice combination.  The only real difference is the base ingredient and whether or not they are sweet or hot.  Given that I want all of my family to be able to eat this chutney, I am going to stick to the mild side of life so my favourite Junior Chef can eat it too.  One day we will get that child to work on his spice metre! In time...

This week I will serve this chutney with a nice slow-cooked pork loin roast or thick cut pork loin chops with purple fingerling potatoes.  Kind of an homage to Lynn Crawford and the dinner we had at her fabulous Ruby Watchco to celebrate our May occasions - my birthday, Mother's Day, our anniversary and Brenden's birthday.

This is a very cool pic of Justin with Chef Lynn in her kitchen.  She was incredible with him and so kind.  He of course charmed her completely - he is a smoothie with the ladies.  When we left the restaurant he actually asked if they needed a door boy..  LOL.

This recipe is kind of a combination of a variety of recipes I found on-line, modified to taste how I wanted it to taste and what I had on hand.

Rhubarb Chutney

1/3 cup sugar
1/3 cup cider vinegar
1 tablespoon freshly grated ginger root
2 teaspoons ground cumin
1/2 teaspoon ground cinnamon
1/2 teaspoon ground allspice
1/2 teaspoon turmeric
3 stalks rhubarb, diced
1 large white onion, diced
2/3 cup golden raisins

Combine sugar, vinegar and spices in a large pan and simmer until sugar is dissolved.  Add rhubarb, onion and raisins.  Increase heat to medium-high and cook until rhubarb is tender and mixture thickens slightly, about 15 minutes. Cool completely.

This recipe made about 1 litre of chutney.  If you plan to keep it for more than a few weeks, place the jars in a hot water bath and process for about 10 minutes in boiling water.

Sunday, May 29, 2011

Toronto Bites on Facebook

Hi everyone!  Thanks for continuing to read my blog. I very recently set up a page through Facebook to make it easier for anyone who wants to follow my blog but does not want to set up a Google account to do so.  Just follow this link, hit LIKE, and you will get Toronto Bites updates once or twice a week!

Toronto Bites on Facebook

Thanks for your continued readership and support!

Sandra

Orange and Roasted Beet Salad with Lemon Fetish

Yes, yes I did say Lemon Fetish, not lemon feta!  Lemon Fetish is a sheeps milk cheese we picked up at the Wychwood Barns farmer`s market from Fifth Town Cheese located in Picton, Ontario.  Lemon Fetish is a small cylindrical cheese, with a rind washed in Red Fife flour.  It tastes like a creamy, lemony, less salty version of feta.  It is perfect on a salad of roasted beets, oranges, greens and watercress.

Orange and Roasted Beet Salad with Lemon Fetish

4 large beets (about 1 pound)
1 1/2 tablespoons olive oil for roasting
4 mandarin oranges, peeled
1/4 cup pine nuts
2 oz Fifth Town Lemon Fetish Cheese (or regular feta cheese)
2 cups watercress, arugula or mixed baby greens

Vinaigrette:

1/4 cup walnut or extra-virgin olive oil
2 tablespoon white wine vinegar
1 teaspoon Dijon mustard
1 tsp liquid honey
Pinch each salt and pepper

To roast beets:

Preheat oven to 400 degrees.  Put on some rubber gloves.  Trim beet tops and scrub beets well if they are young and fresh from the market.  If they are a bit older, you may need to peel them a bit to remove any thick skin.  Cut beets into quarters (or could be more small pieces if your beets are larger).  Place beets in a cast iron pan or other heavy roasting pan, and toss with 1 1/2 tablespoons olive oil.  Roast for approximately 45 minutes until beets are fork tender and well caramelized on the outside.  Set aside in a bowl to cool slightly.

To make vinaigrette: 

In bowl, whisk together oil, shallot, mustard, vinegar, honey, salt and pepper; set aside.

To assemble salad:

Peel oranges and separate into segments and remove any extra pieces of pith.  In a pinch you could use a can of mandarin oranges, but as with most things, fresh is best.  Set aside in a separate bowl.

In small skillet, toast pine nuts over medium-low heat, stirring often, until lightly browned, about 3 minutes.  Cut cheese in to a small dice and set aside.

Place salad greens in a large bowl and toss with half of the dressing.  Divide greens over 4 plates.  Layer  beets and oranges around the salad greens. Sprinkle with nuts; drizzle with remaining vinaigrette. Scatter cheese over top.

Saturday, May 28, 2011

Culinary School Chronicles - Fish

Today's class was a good one.  I learned a couple of new techniques and we made a dish that I am likely to make again.

Today's demo lab had the Chef talking about and making Duchess potatoes and a few derivatives of them.  Duchess potatoes are just mashed potatoes with egg yolks incorporated. The egg yolk gives them stability and makes them brown beautifully in the oven. They are then piped into the form of a rosette and then are baked to make them crispy on the outside.

Chances are you have eaten Duchess potatoes but just didn't know it - quite often they are served along side your chicken or steak at a wedding or function in a ballroom at a big hotel.    Sound familiar?

You know how I have talked before about the 5 Mother Sauces and how if you add certain things to each of them you get a derived sauce - such as adding grated cheese to a Béchamel sauce to give you a Mornay Sauce.  Well, Duchess potatoes are one of the "mother" potato dishes.

If you pipe them like the picture, they are Duchesse.  If you pipe them like a little cup with a space in the middle they are called Marquis potatoes.  And if you pipe them so that they are pear-shaped they are Potatoes William.  They can also be piped into little cigar shapes which are then deep fried into Croquettes.  Lots of variations and all tasty.

But this is a fish class, right? Today's main lab was making Rainbow Trout Vin Blanc - poached Rainbow Trout in a Riesling Wine Sauce with grapes.  Sounds weird, eh?  (Man, that was such a Canadian thing to say).  I was pleasantly surprised at how wonderful and delicate the flavour from the sauce was and how well it worked on the fish.

The two techniques that we learned about today were thickening a sauce with a Beurre Manié (or Burr Man-yay as Chef would say) and poaching fish after making a cartouche from parchment paper.

A Beurre Manié is an uncooked roux made by combining equal parts room temperature butter with all purpose flour.  The two ingredients are mixed together using a wooden spoon until the butter absorbs the flour and becomes a paste, rather like thick mashed potatoes.  You then add your Beurre Manié to a sauce you wish to thicken a little bit at a time.  I tried to make a Beurre Manié a few weeks ago to thicken my Coq Au Vin and I lost patience combining the two and gave up.  This time I knew it would take a good 5 minutes of working it to make the paste so I persevered and my sauce turned out perfectly!

The other thing we learned was to make a cartouche and use it to poach our fish.  A cartouche is just a paper lid made from parchment paper that is used to slow down the reduction of moisture in cooking. This kind of lid lets a little moisture escape, whereas using no lid lets lots of moisture escape and a full lid lets practically none escape.  Here's a picture of mine from class.

Making a cartouche is like making a paper snowflake.  You fold your parchment in half, then in half again, and then start folding from the corner inwards to make a conical shape, and then fold 2 more times.  It looks a bit like a paper airplane at that point, then you measure your paper tip pointing in towards the centre of your pan, then cut to size.  If you have done it correctly, you should end up with a circle of parchment that is the same size as the inside of your pan.

Rainbow Trout Vin Blanc

4 fillets of farmed Ontario Rainbow Trout, cut into 2 pieces each
20 seedless green grapes, cut in half
2 shallots, peeled and finely diced
1/2 cup medium-dry Canadian Riesling

Sauce:

2 cups fish stock
3/4 cup 35% cream or whipping cream (don't skimp here or it will separate)
4 sprigs of parsley, washed, dried and finely chopped
1/2 lemon
Salt and pepper to taste

Preheat oven to 350 degrees.  Butter a sauté pan well.  Sprinkle bottom of pan with chopped shallots.  Sprinkle pan with cut grapes.  Lay fish fillet pieces on top of grapes and shallots.  Add wine and then add  enough fish stock to just cover the fish.  Cover the fish with your cartouche and take to the stove.

Bring fish to a gentle simmer over medium heat and then cook for about 5 minutes until the fish appears cooked through.  Keep an eye on the fish once you start poaching as it does not take long to over-cook!  Remove fish from pan when cooked and place on an oven-safe tray and set aside.

Add the cream to the pan and return to a low boil, and cook for about 5-10 minutes to reduce sauce by 1/4.  A little at a time, add the Beurre Manié to the sauce, patiently stirring to incorporate fully.  Keep adding Beurre Manié until it is all incorporated.  Continue to cook on low to cook away the raw flour flavour.  When the sauce is ready, it should coat the back of a spoon.

Right before serving, pop the fish back into the oven for about 5 minutes to reheat.  To serve, place a piece of fish fillet on a plate and top with a large spoonful or two of sauce.  Sprinkle with chopped parsley and give a squeeze of lemon if desired.

Beurre Manié

1 tablespoon butter, softened
1 tablespoon all-purpose flour

Combine both ingredients using a wooden spoon until the butter absorbs the flour, resulting in a toothpaste like consistency.


Thursday, May 26, 2011

Momofuku Red Dragon Sauce

Ok, ok, I know....I am a bit Momofuku crazed at the moment, but honestly, I have a ton of cookbooks, and this is literally the first one I have read cover to cover and been fascinated by the entire concept of in a very, very long time.

Maybe it is the fact that I have it for my iPad or maybe it is just because it is an amazing book, but I can`t stop reading it and going back and flipping.

The only one who interests me as much as David Chang right now is Julia Child - another leader in the culinary world.   One spent years trying to make French cooking and technique accessible to the average American housewife, while the other breaks down cultural and technical barriers to elevate ordinary food to extraordinary levels using both standard and molecular gastronomic concepts.

There are a ton of food bloggers out there who are actually making it their mission to cook the entire Momofuku cookbook.  I can see why but there are things in that book that I just like to read about but have no interesting in making.

Like their Brick Chicken.  So...to me, brick chicken is when you cut open and butterfly a chicken and grill it with a brick on it to keep it flat on a grill.  In the Momofuku world, it is a full chicken that is boned, then reshaped and glued together with what Chang calls "meat glue" (a chemical product called Transglutaminase) and then formed into the shape of a brick, which you then deep fry and cut into pieces like a loaf cake!  Odd?  Yes!  Interesting? Yes!  Will I make it?  Absolutely not.  Maybe when they open a restaurant here I might order it, but that's as close as I will come. And he makes noodles out of things like fish purée which he cooks in a thermal immersion circulator in a sous vide method!

The below is Chang's recipe for what he calls Red Dragon Sauce.  This sauce is the perfect blend of salty, sweet, spicy and sour and makes use of a bunch of things I bought at P.A.T. in Koreatown a few weeks ago. I must admit this is one thing I love about living in Toronto....if I want to experiment with a particular type of food, then the city has a neighbourhood I can go to that always has a specialized restaurants and grocery stores that caters to the locals.  Greektown, Chinatown, Koreatown, Little Italy/Portugal, Corso Italia, Little India, Kensington Market....all are accessible by transit and are within 30 minutes.

Three of us in the house LOVE - I mean LOVE - spice.  However Justin (may have been switched at birth?? nah...) finds one drop of hotsauce too much in anything.  He gasped at this sauce, while the rest of us thought it had just a little heat.

And as you will see, I am experimenting with it in a number of different applications - as a sauce for rice cakes, as a dipping sauce for summer rolls and who knows what else.  I bet it would be awesome as a marinade for baked tofu or chicken.  This one is definitely a keeper and well worth the hunt for the ingredients.

Red Dragon Sauce

From David Chang: Momofuku

¼ cup of water
½ cup of sugar
¾ cup of ssämjang (fermented bean and chile sauce), or more to taste
2 tablespoons usukuchi (light soy sauce), or more to taste
1 teaspoon sherry vinegar, or more to taste (I used rice vinegar)
1 teaspoon Asian sesame oil, or more to taste

Bring the water and sugar to a boil in a small saucepan, stirring until the sugar dissolves. Remove from the heat and let cool for a few minutes, then stir in the ssämjang to dissolve it. Stir in the soy, vinegar, and sesame and taste the sauce: no one flavor should stand out, but all should be present and accounted for. Adjust as necessary.


Monday, May 23, 2011

Banana Whoopie Pies with Chocolate Chips

Today is a holiday in Canada - so happy birthday Queen Victoria you old doll and thanks for getting us the day off.  Unfortunately, the beautiful sunny weather that blessed us on Saturday has turned back to the blech that we've been experiencing most of this Spring.  We even had hail for about 3 minutes last night around midnight.

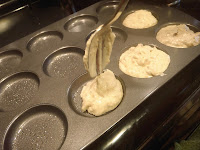
Justin and I have been itching to make Whoopie Pies for sometime now but the opportunity just didn't present itself until this morning.  I purchased a Whoopie Pie pan (kind of a muffin top pan if you know what I mean) and a book on making Whoopies a while back, as I like to read about food sometimes as much as I like making it.  So this morning we hung out in the kitchen for a bit using the Kitchen Aid before his friends come back from the cottage and he abandons Mom for them, Xbox and Annoying Orange on Youtube.

Looking around the kitchen to see what ingredients we had on hand, I noticed four rather sad looking bananas.  You know what I mean ...not unhappy bananas... just soft with lots of brown spots.  Basically the kind of banana I wouldn't eat, but with which I would bake; hence Banana Whoopie Pies.  And since we have some chocolate sprinkles and chocolate chips in the cupboards, they will make an appearance also.

The following recipe is adapted from Whoopie Pies by Sarah Billingsly and Amy Treadwell.  It is pretty simple and really more like a banana muffin mix than a cake.  I also used half multigrain flour to give the cake a bit of crunch and texture.  Taste was very nice but I think it would have benefited from another banana.

Next time, I guess...

Banana Whoopie Pies with Chocolate Chips

1 cup all purpose flour
1 cup multigrain baking flour
1 teaspoon baking soda
1/2 teaspoon salt
4 tablespoons butter
4 tablespoons grapeseed or vegetable oil
3/4 cup granulated sugar
1 teaspoon vanilla extract
2 large eggs
3 very ripe bananas (try 4 next time)

Position rack in the centre of the oven and preheat to 350 degrees.  Spray pan with cooking spray or use a paper towel to grease each pie form.

Sift together both flours, baking soda and salt onto a sheet of parchment or waxed paper.

In the bowl of a mixer fitted with a paddle, beat together butter, oil, sugar and vanilla until light and creamy, about 3 minutes.  Add the eggs and beat to combine.  Then add the bananas, and continue to combine.

With the paddle running on low (speed 2) slowly add in the flour mixture from the parchment paper ( you would pick up both sides and use it like a feeder).  Beat until well combined, being sure to scrape down the sides of the bowl several times.  Do not overbeat - you just want to combine all the ingredients for a few minutes.

Spoon banana batter into Whoopie pie moulds, being sure not to over-fill or you will have muffin tops (like I got....sigh).  Fill to about 2/3 of the mould's capacity.

Bake in oven for about 17-20 minutes and cakes spring to the touch and are slightly brown on top. Remove cakes from the oven and allow to cool in the cake pan for at least 5 minutes before transferring them to a rack to cool completely.

Classic Cream Cheese Filling

4 ounces cream cheese, at room temperature (we used reduced fat)
4 tablespoons butter, at room temperature
3 cups icing sugar
1 teaspoon vanilla extract

In the bowl of a food processor fitted with the paddle attachment, beat together the cream cheese and butter on medium speed (speed 4ish).  Add the sugar and beat on low (speed 2) until combined.  Add the vanilla and increase the speed back to medium.  Beat until creamy, smooth and fluffy about 4 minutes.

To assemble:

Chocolate Chips (about 1/2 cup)
1 banana, peeled and chopped
Chocolate Sprinkles (optional)

Pipe or spread icing on the flat inside half of one Whoopie pie.  Add a few slices of banana and sprinkle with chocolate chips.  Top with other Whoopie pie half and press lightly together.  Roll in chocolate sprinkles if desired.

If the icing seems a bit soft, refrigerate for half an hour before enjoying.

Cook's Note:  The pies turned out delicious and they were quickly consumed by a band of roaming children who arrived starving at our door.  However, next time, I think I am going to try to make them without the pie pan and in a "mini" size so they are only a few bites. 

Sunday, May 22, 2011

Sauteéd Sunchokes with Roasted Garlic and Thyme

Yesterday was a red letter day in Toronto weather-wise - and it is about time! And as it is the May Two-Four weekend my culinary school is closed (Sorry I was sick last Saturday so I didn't make it to class and hence didn't write about it last week either - just lasagne anyway so nothing interesting missed.) so we decided to hit the Saturday morning Farmer's Market at Wychwood Barns. It is still early in the year for produce but we saw mostly ramps (wild leeks), asparagus, fiddle heads, some potatoes and sunchokes.

These knobby dirty fellows are sunchokes, also called Jerusalem artichokes, and are a tuber I've been meaning to try but just never got around to. They look like a bulbous ginger root, and have the flavour somewhere in between a potato and an artichoke (both things I love). What I did not realize until I started looking into recipes ideas for them, is they are the tuber of the sunflower plant!

The best way to serve them is either peeled and in a pureé or roasted with the skins on, well scrubbed, and any knobby bits removed. I always enjoy potatoes cooked in our extremely well seasoned 19 year old cast-iron skillet (one of my favourite wedding gifts still) so I went for the latter option. And it was a big hit with everyone.

Sauteéd Sunchokes with Roasted Garlic and Thyme
1 1/2 pounds sunchokes (also called Jerusalem artichokes), sliced into 1/4 inch rounds
6 cloves of garlic, peeled left whole
2 tablespoons olive oil (sunflower seed oil would be good too!)
A good pinch salt and pepper
2 Tablespoons parsley, chopped
3 sprigs fresh thyme

Preheat the oven to 425 degrees. Scrub the sunchokes well under cold running water, scrape with a paring knife to remove any knobby bits, then slice 1/4-inch thick. Add the sunchokes and garlic to a cast iron or other heavy pan and toss with the olive oil so the bottom of the pan and the sunchokes are lightly coated. Add thyme, salt and pepper. Bake for 30 minutes, until the sunchokes are tender inside, like a potato.

We are serving this with grilled chicken marinated in a smoked paprika Spice Rub.

Happy Victoria Day Weekend!

Saturday, May 21, 2011

Old-Fashioned Hamburger Relish

Yes, the pickle fetish is still going on, and I figure with the arrival of more and more fresh produce at the farmer's market and the real start to BBQ (and soon camping) season, I need to think of condiments.

Last week, I made corn relish - which incidentally turned out fantastic - so today I thought we'd go red and make a red relish.  I really am not a fan of the sweet green stuff, but the red it wonderful on a sausage or burger. This version is tangy and a bit tart with a hint of tomato and mustard and puts the commercial stuff to shame!

Old-Fashioned Hamburger Relish

1 English cucumber, peeled, seeded, and finely diced (about 2 cups)
1 medium yellow onion, finely diced
1 mediumsweet green pepper, cored, seeded, and finely diced
1 medium sweet red or yellow pepper, cored, seeded, and diced
3 tablespoon kosher or pickling salt 

In large bowl, combine cucumbers, sweet peppers, celery, onion and salt

Cover with boiling water and let stand for 1 hour. Drain; rinse under cold water and drain well.


2 cups chopped seeded peeled tomatoes (canned is ok if you drain and seed)
2 cups cider vinegar
1 tablespoon mustard seed
1 teaspoon turmeric
1/2 teaspoon ground cinnamon
1/2 teaspoon ground allspice
1/4 teaspoon cayenne pepper
1 cup granulated sugar
1/4 cup tomato paste

In large heavy saucepan, bring to boil tomatoes, vinegar, mustard seed, turmeric, cinnamon, allspice and cayenne pepper, stirring often; reduce heat to medium and simmer for 30 minutes or until tomatoes are soft.

Stir in sugar, tomato paste and drained vegetables; bring to boil, stirring often. Reduce heat to medium and boil gently, stirring often, until thickened, about 20 minutes.

Cooks Note:  For a thicker relish, make a slurry of 2 teaspoons flour dissolved in 1/4 cup cold water.  Add the slurry to the relish and bring to a boil to reach maximum thickness.  I like a thicker relish.

Fill and seal sterilized jars; process in boiling water bath for 10 minutes.  Let jars cool to room temperature then store in a cool place for a few weeks before opening.


Tuesday, May 17, 2011

Justin's Junior Chef Bloggette - Quick Pickles

Me and my brother love pickles. So much, that we can go through a jar within a day of my Mom buying them at the grocery store. She cannot keep up with us.

So we decided to try to make our own pickles at home. We are trying two different ways of making them. The first recipe is from David Chang of Momofuku (surprise surprise) for Salt and Sugar Pickles and the second is a recipe my Mom found over at Closet Cooking for pickled carrots - we just used cucumbers.

Super-quick Salt and Sugar Pickles
(adapted from David Chang)

1 teaspoon fine sea salt
1 teaspoon sugar
3 small seedless cucumbers, sliced crosswise 1/4 inch thick

Directions:

In a small bowl, combine the salt and sugar. Arrange the cucumbers in a separate bowl; sprinkle the salt and sugar mixture over cucumbers and toss. Let the pickles stand for at 5 to 10 minutes before serving. We put ours in a jar and put them in the fridge. Shake them up every few minutes at first, and liquid comes out of the cucumbers to make a brine.

Result:  They taste good but really just like cucumbers with salt and sugar on them, which I guess is ok, but we ate them all.  By the next day.

+++++++++++++++++++++++++++++++++


Quick Pickled Cucumbers

1 cup warm water
1/4 cup distilled white vinegar
2 tablespoons sugar
2 teaspoons salt
3 small seedless cucumbers, sliced into long thin strips

Directions:

Mix the water, vinegar, sugar and salt until the sugar and salt dissolves. Place the cucumbers in a glass mason jar and cover with the pickling liquid. Let pickle for at least and hour and store in the fridge for up to a week.

Result:   These were more like the kind of pickles that we expected and tasted great.  We took a bunch with our lunches.  All gone.

Monday, May 16, 2011

Corn Relish - Just for Fun

I gave my love a cherry without a stone
I gave my love a chicken, without a bone
I gave my love a ring, without an end
I gave my love a baby, with no cryin'..errr....some corn relish.....

Well I definitely wish that last part was true! I guess our kids were never real criers - although I swear there are more tears now (mostly from the 15 year old sitting on the 10 year old's head) than when they were younger. Sibling rivalry - something I will just never completely understand as an only child.

So, since I couldn't give my love a teen and tween with no cryin', what I gave him for our anniversary is Corn Relish. I know...that might sound a bit lame but we've been married a long time. We can each buy ourselves whatever we want. Gifts are nice, but gestures mean more. So I hope he likes it. He was saying yesterday how much he loved corn relish when he was younger and used to put it on sausages, hotdogs, and hamburgers but that he hadn't had any in ages.

Well, strangely enough I had picked up corn from the store on Saturday to make a dish that never got made so I had everything I needed to make it except celery seed which was easily acquired. I've been messing around with the concept of pickling lately and reading a bit in this area, so here it goes! My first attempt!  I am sure there will be many more to follow.

Sandra's Corn Relish

6 ears corn, husked and cleaned
3 tomatoes, seeded, and diced
1/2 large green bell pepper, chopped
1/2 large red bell pepper, chopped
1/2 red onion onion, chopped
1-2 jalapeño peppers, chopped and seeded (if you are a wimp)

3/4 cup white sugar
1 cup apple cider vinegar
1 tablespoon salt
1 teaspoon celery seed
1 teaspoon mustard seed
1 teaspoon turmeric
2 teaspoons fresh basil, in chiffonade

Directions:

Holding the cob of corn upright, run your knife down the cob to cut the kernels from the cobs. Scrape the cobs with a large spoon to remove remaining juices.

In a large saucepan, mix the corn kernels and juice, tomatoes, green bell peppers, red bell peppers, jalapeño and onion. In a medium bowl, whisk the sugar, apple cider vinegar, salt, celery seed, turmeric and mustard seed. Pour into the saucepan over vegetable mixture. Bring to a boil, then simmer 20 minutes. Transfer the finished relish to sterile jars and seal. Refrigerate until serving.

Sunday, May 15, 2011

Papardelle with Duck Ragu

A few weeks ago I had Duck Ragu for lunch at one of my favourite Toronto lunch spots, Mercatto. It was rich, delicious and something I knew I wanted to make at home eventually.

Since tomorrow is my 19th wedding anniversary, I thought it might be nice to make something a bit laborious and luxurious to celebrate the day I made Glen the happiest man on the planet. Ha ha! Well, it hasn't always been easy, and we've certainly had our moments but making it to 19 years these days is a massive achievement in tolerance, patience, understanding and, of course, love.  Happy anniversary tomorrow!

While on a different kitchen mission, I stumbled across Gwyneth's Paltrow's cookbook called My Father's Daughter at Home Sense, and it contained a recipe for Duck Ragu, so I picked it up with plans to make one weekend.   The below recipe has been adapted from Gwyneth's recipe with a bit of Sandra thrown in for good measure, as usual.

I will reserve the duck fat that comes off for making potatoes another time - potatoes cooked in duck fat are one of the most wonderful things in the world. Sorry if I offended any vegetarians there, but it is true. I also have plans to make a duck stock and turn that into a soup with soba noodles and enoki mushrooms if I can find them. Maybe even some Korean pancakes on the side, but that's another day and another post.....

Papardelle with Duck Ragu

1 medium sized duck, washed and dried
1 tablespoon coarse sea saltFreshly ground black pepper

To Roast the duck:

Preheat the oven to 350°F.  Sprinkle the duck with salt and pepper, inside and out. Roast for about of 2 hours, flipping it from its back to its breast (and vice versa) every 1/2 hour. Let it cool in the pan until you can handle it. Drain off the fat and reserve it for another use.

To make the Ragu:

4 slices bacon, diced
1 tablespoon olive oil
1 medium yellow onion, peeled and finely diced
2 medium carrots, peeled and finely diced
3 cloves garlic, peeled and minced
3-4 sprigs fresh thyme, bruised but whole
2 cans San Marzano tomatoes with their juice, chopped
1 jar passata from San Marzano tomatoes
1 cup red wine, preferably Italian
500 g (1 lb) pappardelle

While the duck is roasting, heat 1 tablespoon of olive oil in a Dutch oven over medium-high heat and add the bacon. Cook for 5 minutes, stirring occasionally, or until starting to crisp. Add the onion, carrots, celery, garlic, and rosemary, turn the heat down to low, and cook, stirring occasionally, for 10-15 minutes, or until softened.

Roughly dice the tomatoes as you take them out of the can.  A good trick I learned from our Chef is to pierce each tomato with a knife as you take them out of the can, to allow any juice inside the tomato to come out, making them easier to dice.

Add the diced tomatoes and their juice and the jar of passata (tomato pureé)  to the pot.  Put a little bit water in the cans and jars and  swish it around to get all the tomato stuck to the sides pour into the pot.

Add the wine, a good grind of pepper, and a large pinch of salt. Bring sauce to a boil over medium heat, and and then turn the heat down low and let simmer for about 1 hour.

About 15-20 minutes before you want to eat, bring a very large pot of water to a boil over high heat.  As the water comes to a boil, add 2 tablespoons of salt to the water.  The water should taste slightly salty and almost like the sea.  Add the pasta and cook according to package directions (approximately 6-8 minutes).  When finished cooking then drain well.  Return the pasta to the pot, and add a few large ladles of ragu to the pasta and toss.  

To serve, place coated pasta in a large bowl, pour a ladlefull of ragu over the pasta.  Sprinkle with grated parmesan cheese and chopped parsley if desired.

Asian Duck Stock

This is a versatile stock that can be reduced and concentrated to make a broth for soup or can be turned into a sauce or become part of a stew.  Duck is not a terribly inexpensive meat, so after you make something like a Duck Ragu, this is a great way to get the most out of your money spent and squeeze out another meal.

1 duck carcass, broken up
1 heaping teaspoon Chinese 5 Spice Powder
1 onion, peeled and halved
2 cloves garlic, peeled and smashed
2-3 half inch slices of ginger root, peeled
5-6 black peppercorns
1 tablespoon sea salt
6 cups cold water

Place duck carcass in a large stock pot and sprinkle with Chinese 5 Spice powder.  Add onion, garlic, peppercorns, ginger and sea salt.  Add enough cold water to just cover the duck, about 6 cups.  Bring to a boil over medium heat, then lower heat to a simmer. Skim off any foam that rises to the top of the stock during cooking.  Simmer on low for about 1 hour.  When ready run stock through a fine mesh strainer.  Once the carcass has cooled slightly, remove any meat that remains on the duck and set aside.


Saturday, May 14, 2011

Toronto Bites on Facebook

Hi everyone!  Thanks for continuing to read my blog. I very recently set up a page through Facebook to make it easier for anyone who wants to follow my blog but does not want to set up a Google account to do so.  Just follow this link, hit LIKE, and you will get Toronto Bites updates once or twice a week!

Toronto Bites on Facebook

Thanks for your continued readership and support!

Sandra

Waste Not Issue #4: Basil

This series of posts was inspired by the fact that I needed to get some fresh basil to make a basic tomato sauce. Whenever possible, I always use fresh basil in my recipes, especially pasta sauce.  It was something I read or saw with Mario Batali years ago that just stuck with me - in sauce dried oregano is best but always, always fresh basil.  I like to stick with Mario on that if I can.  And in this day and age of hydroponics and greenhouses in winter what not, you can almost always find decent fresh basil around.

Well Sunday I went to Longo's in search of fennel sausage.  I have literally been all over the St. Lawrence Market and elsewhere trying to find someone who makes it, when I read that Longo's store made brand was very good. A 20 minute drive later, I had it in my possession and the biggest, bunch of basil you could ever get for $2.49.  This is the kind of basil you expect in the peak of summer for that price.  So I bought it thinking "What could I do with it?"

The resulting post are a few ideas for using up a big bunch of basil.

Round 1 - Basic Tomato Sauce

It was the reason for my trip in the first place and one of the most versatile Mother sauces.


Round 2 - Basil Pistou

This Basil Pistou (or Pesto) is super simple and makes a great condiment.  You can use it to dress pasta, or you can drop a spoonful of it into a nice soup (like a Cream of Mushroom or Tomato) and the fresh flavours just bring it alive.

You could spread it on crostini and top with cheese and Oven Dried Tomatoes.  You could use it on a sandwich in place of mayonnaise (that was a very popular wrap today for my kids I tell you!).

The list goes on and on and is only limited by your imagination and creativity.

Round 3 - Basil Oil

I have always been envious of the cute little dots of sauces that chefs make on your plates as they are creating your dish to come out to you, so I thought why not make my own Basil Oil.  This one also has some garlic and a bit of preserved lemon to it. You really should make the preserved lemons.  So useful and takes barely minutes.


Other Ideas:


Caprese Salad:   One of my favourite summer salads and so simple.  This is on our round of camping menus and people are amazed we eat so well when camping, but really it is only a few ingredients, best when tomatoes and basil are at their peak in the summer.

Take a ball or 2 of fresh mozzarella, slice in rounds.  Take 2 or 3 tomatoes, slice them into rounds.  On a plate, lay out both alternating cheese, tomato, cheese, tomato.  Drizzle a small amount of basil oil (or regular olive oil) over the salad and a small amount of balsamic vinegar.  Sprinkle with a small amount of salt and pepper and some shredded basil.  Allow to sit for a few minutes before serving.


Basil Oil

This is an incredibly versatile oil that can be used to fancy up plates, in a salad dressing or as part of a marinade.

If you find yourself with a lot of basil to use up, I highly recommend this.
And its got me wondering about a basil simple syrup for a savory cocktail of some kind, as they are all the rage in T.O. right now.

Basil Oil


2 1/2 cups lightly packed fresh basil leaves
1/8 piece preserved lemon (or regular lemon)
1 clove garlic, just pressed the the tine of your knife to crack the skin a bit
1 cup olive or cannola, grapeseed or vegetable oil (see notes)

Directions:

Rinse and drain basil leaves. Pat leaves dry with a towel. In a blender or food processor, combine basil leaves and oil. Whir just until leaves are finely chopped but not puréed.

Pour oil and basil into a small sauce pan over medium heat. Stir occasionally until oil bubbles around pan sides and reaches 165° on a thermometer, 3 to 4 minutes. 

Remove from heat and let stand until cool, about 1 hour.  Using an immersion blender, pureé basil into the oil. It will become a bright lovely green colour.

Use immediately or cover in an airtight container and store in the refrigerator up to 3 months. The olive oil may solidify slightly when chilled, but it will quickly become liquid again when it comes back to room temperature if you give it a shake.

Tuesday, May 10, 2011

Basil Pistou (or Pesto)

There really isn't a lot of difference between pistou and pesto.  The first, is the French variation and most often does not contain pine nuts.  The second version, the one most of us are more familiar with, is the Italian version and usually does contain pine nuts or walnuts.  

My experience is the French version is more solid and less oily than the Italian version.   The French tend to use pistou to add a burst of flavour to a dish right before serving.  For example in Soupe Au Pistou, which is a very simple vegetable soup made from Summer's finest produce, a "quenelle" of pistou is placed at the bottom of the soup bowl and the soup poured over it.  More often than not, I see pesto used to flavour a pasta in Italian cooking.

A quenelle really is just a football shape of whatever - in this case pistou - and it is made by passing the ingredient back and forth between two spoons to create the shape.  I am not very good at it but I have tried to make my quenelle as well as I can.

Basil Pistou

2-1/2 cups  packed fresh basil leaves
1/2 cup grated Parmesan cheese, coarsely grated
pinch of salt and pepper
3-4 tablespoons olive oil
1 large clove garlic, chopped
1/4 cup pine nuts (optional but I like them)

Warm a small frying pan over medium heat.  Toast pine nuts in the pan once to heat, being sure to keep tossing them around until you start to hear them sizzle.  You want them slightly brown but not burnt, so don't walk away - this will only take a minute or two, I promise.  Once toasted remove pan from heat and set aside so nuts cool.

In the bowl of a food processor combine basil, Parmesan cheese, salt, pepper, garlic and 2 tablespoons oil.  Pulse well until combined.  Drizzle in remaining olive oil to aid in processing.  Continue to pulse pistou until well combined and relatively smooth with no large pieces of basil or cheese remaining.

Use right away or store in an airtight container or jar for up to 1 week.  Alternatively, you can freeze the pistou in ice cube trays, then store in a plastic bag until you need to add some herbaceous freshness to a dish. 


Basic Tomato Sauce

One of the most serviceable dishes anyone can learn to make is a basic tomato sauce.  Going back in time a bit, it is one of the five French mother sauces and serves as the basis for many, many other sauces.

Basic Tomato Sauce

1 tablespoon extra-virgin olive oil
1 large onion, finely diced
3 garlic cloves, peeled and thinly sliced
6-8 basil leaves, roughly chopped
1/2 medium carrot, finely grated
2 jars Passata (San Marzano tomatoes are preferred as they are the best)
Salt and pepper to taste

Directions:

In a large, heavy saucepan, heat the olive oil over medium heat. Add the onion and garlic, and cook until soft and light golden brown, about 8 to 10 minutes. Add the carrot, and cook 5 minutes more, until the carrot is quite soft. Add the tomatoes and juice and bring to a boil, stirring often. Lower the heat and simmer for 30 minutes until as thick as hot cereal. Season with salt and serve.

This sauce holds 1 week in the refrigerator or up to 6 months in the freezer.

Sunday, May 8, 2011

Culinary School Chronicles - Soup

I must admit I was a bit disappointed by this week`s class on soup.  Now, I am a really big fan of soup so I was hoping to do something interesting and challenging like making and clarifying a consommé using an eggwhite and meat "raft" - basically something I had never done before, but nah.  We made vegetable soup.  Ho hum.

We talked about consommé mind you, but nope - no raft was built so I guess it will be one of those rainy Sunday projects I find myself engaging in from time to time.  Like making Espagnole Sauce or Demiglace.  Sigh.

Then again, until not that long ago, my concept of what consommé is came from my childhood memories of my Mother opening a can of Campbell`s beef consommé whenever I was sick - she just called it clear soup.

Consommé is a full flavored clear broth (a broth is a fortified stock) made from a base stock - usually chicken, beef or even duck. After you make your basic broth, you strain all the big pieces of vegetable or meat out of it, then it is clarified (meaning all the impurities are removed) to get the perfectly clear appearance that is characteristic of consommé.

To create a raft and clarify your consommé you combine ground meat with mirepoix (carrot, onion, celery), egg whites, and then add your stock.  You bring the stock and meat raft to a boil slowly, then reduce to a simmer.  The constant simmer creates a current inside the pot that floats all the impurities and fat in the stock to the surface of the liquid.  As the stock simmers, the protein in the egg and meat congeal (it is kind of gross) at the surface of the stock, forming a 'raft' which captures and holds any nasty bits once in your stock. After about 45 minutes you should be left with a clear liquid.  The consommé is then refrigerated to remove any remaining fat and can be run through a cheese cloth just to make sure.

Michael Ruhlman has a great post called The Consommé that describes the procedure very well.  So you can read his post, or just wait for yet another rainy Sunday in Toronto so I will make one and share with you all.  Shouldn't take too long.  Check back next week as this is an incredibly wet Spring in Toronto.

Much more interesting than vegetable soup, eh?  Anyway.....so what we did do was have a pretty brief discussion on the 5 French Mother Sauces (thankfully I educated myself on that previously) and then watch a demo of how to make a Chicken Velouté - and that is something that is still on my list of things to make.  Although it was like nails on the chalkboard for me every time the Chef would say Vel-oooot-eh (emphasizing the `oooo`) instead of the proper pronunciation of Vel-oo-TAY (emphasis on the `tay`).  Arrgggh.  But he is a super nice guy and I am learning stuff, so I`ll shut up now about his terrible pronunciation of French cooking terminology.

Until next Saturday that is....  :-)

Thursday, May 5, 2011

Cereal-Milk Panna Cotta with Cornflake Crunch

In my search for a truly unique and interesting dessert I came across a recipe in my current cookbook obsession Momofuku by David Chang and Peter Meehan. Christina Tosi is their Head Pastry Chef and the creative genius behind such Momofuku desserts as Crack Pie, the Composte Cookie, and Cereal-Milk Panna Cotta.

Apparently Tosi wouldn`t drink milk as a child unless it was soaked in Corn Flakes or Frosted Flakes, a childhood memory which is the origin of the Cereal-Milk phenomenon at Momofuku and its sister store Momofuku Milkbar, and the Panna Cotta at Ko, their other restaurant.

And this is really, really, freaking good.  The topping is like crack!  It says `optional` in the recipe, but I cannot see how there is any option but to make it!!!  I can`t believe how such humble (and weird) ingredients come together to make the most interesting and delicious dessert!  And it truly reminds me of the left-over milk in the bottom of a cereal bowl after you eat all the crunchy goodness - in the best way possible.

This is a bit of a long post so I am including more photos than normal just to prove that this recipe, though it takes time, is not that hard

Cereal-Milk Panna Cotta with Cornflake Crunch

NY Times Recipe Published: February 17, 2009
Time: 1 hour, plus 45 minutes steeping and 2 hours refrigeration
Serves 8

FOR THE PANNA COTTA:

6 cups Kellogg’s Corn Flakes
3 cups whole milk
2 cups heavy cream
3/4 teaspoon kosher salt
1/4 cup packed light brown sugar
1 tablespoon powdered gelatin (about 1 1/2 packages)

FOR THE TOPPING (OPTIONAL):

3/4 cup Kellogg’s Corn Flakes
3 tablespoons nonfat milk powder
1 tablespoon granulated sugar
1/8 teaspoon salt
3 tablespoons unsalted butter, melted.


Directions for Panna Cotta:


To make panna cotta, heat oven to 300 degrees.

Spread cereal on a baking sheet and bake until toasty, about 12 minutes.


While still warm, transfer to large bowl or container and add milk and cream. Stir to combine and let steep 45 minutes.

(Dessert will get too starchy if it steeps longer.)


Strain into a microwave-safe bowl or a saucepan, pressing to extract liquid. (Discard soggy cereal or eat it.)

Just don`t taste it at this stage or the true flavour of the dessert won`t come through!


Add salt and brown sugar, and heat just until milk is hot enough to dissolve sugar, watching carefully. Stir gently to dissolve sugar.

Ladle 1/4 cup milk mixture into a small bowl and mix in gelatin. Set aside 5 minutes, then whisk soaked gelatin back into remaining milk mixture.

Ok...you can taste it now...yum!

Divide mixture among 8 ramekins or silicone molds. Refrigerate until set, about 2 hours. If using ramekins, cover and reserve until ready to serve. If using molds, freeze 1 hour and pop out onto wax paper (not parchment), then refrigerate until ready to serve.

Directions for Topping:

Heat oven to 275 degrees.

Put 3/4 cup cereal in a large bowl and crush lightly with your hands. In a small bowl, stir together milk powder, sugar and salt.

Sprinkle mixture over crushed flakes and add melted butter.  Toss to coat cereal evenly.


Spread on a baking sheet lined with parchment paper (or a nonstick baking mat) and bake 20 minutes, or until deep golden brown.

Remove from pan and set aside to cool.

Serve immediately or store in an airtight container up to 1 week.


To serve:

When ready, serve cold panna cottas in ramekins or turn out onto plates. Sprinkle with corn flake topping.


++++++++++++++++++++++++++++++++++

This recipe has got me wondering....if something made of Cornflakes soaked in milk and cream can taste so good, what would it be like if I tried it with other cereals from my childhood. What commercials stand out the most for me.....

`Can`t get enough of that Sugar Crisp`with that bear in a turtleneck driving around getting into trouble, or that bird Sonny who is `Cuck-oo for Cocoa Puffs!`. Tony the Tiger and Frosted Flakes were order of the day at my house. And I always wanted Frankenberry or Lucky Charms but my Mom wouldn`t let me. Waaaahhhhh!

Well now I am the Mom, so maybe I`ll mess around a bit with those next!

Tuesday, May 3, 2011

Waste Not! Issue #3: Easter Ham

Ok, first of all I know Easter is over and long-gone but realistically you could at any point find a great deal on a bone-in ham, so why not .  Also, I admit I was a bit ``hammed out`` after Easter - well really I was completely fooded out - so it took me a while to get to the left overs to play around with another round of Waste Not!

So in this issue we`ll pretend you are having company over and want to make a simple but elegant main course, but want left overs to turn into a few different preparations during the next week.

Round 1:

Marmalade Glazed Ham with Orange Tea Sauce

This dish is incredibly easy and it is very hard to destroy a ham.  In fact, you really have to be bent on killing it completely to do anything wrong with this recipe.  The glaze is based on orange marmalade with a bit of mustard, and the sauce uses a few flavoured teabags, a bit of marmalade and some mustard.  Wonderful and wonderfully simple.

Served with :

Boursin Cheese Mashed Potatoes
Roasted Asparagus

Round 2:

Spaghetti Carbonara

This dish is a perfect quick mid-week dinner.  The sauce is really just a few eggs, mixed with some parmesan cheese, but combined with the ham, pasta and herbs, the taste is wonderful and light.


Round 3:

Ham and Cabbage Soup
A delicious and hearty soup that makes great use of the ham bone and the left over meat embedded there.  It is wonderfully rich and slightly smokey. a fact you could probably play up even more with a few drops of liquid smoke.  I find the use of sweet potatoes instead of white potatoes adds a slight sweetness and smoothness to the soup that is just out of this world.

Marmalade Glazed Easter Ham with Orange Tea Sauce

Once or twice a year I like to make a ham, generally at Easter and then maybe one other time.  I usually go for the smoked bone-in hams mostly because I find the flavour is much better with the bone.  Also, it gives you a great start to an interesting stock for another use.


For ham:

1 10-15 pound smoked fully cooked bone-in ham

Glaze:
1 cup orange marmalade (1 jar Robertsons Marmalade preferred and reserve 3 tablespoons)
1/4 cup Dijon mustard
2 tablespoons water

Orange Black Tea Sauce:

2 cups water
4 orange-spice herb tea bags or black tea bags
1 cup pineapple or orange juice
3 tablespoons orange marmalade
1 tablespoon Dijon mustard
1 tablespoon cornstarch dissolved in 1 tablespoon water

Directions:

Position rack in center of oven and preheat to 325°F. Trim any rind and excess fat from upper side of ham, leaving 1/4-inch-thick layer of fat. Using long sharp knife, score fat in 1-inch-wide diamond pattern. Insert 1 clove into center of each scored diamond. Place ham in heavy large roasting pan. Bake until thermometer inserted into center of ham registers 150°F., about 3-4 hours depending on the size.

When ham has been cooking for about 3 hours.....

Melt 1 cup marmalade in heavy small saucepan over medium heat. Whisk in 1/4 cup mustard and 2 tablespoons water. Cook on low until mixture melts and can coat spoon without dripping, about 6 minutes. Set mixture aside. Increase oven temperature to 425°F.  Remove ham from oven and from cooking pan.  Line same pan with foil.  Return ham to pan. Generously spoon marmalade mixture over ham. Bake ham until glaze is set and begins to caramelize, about 20 minutes. Let ham stand 20 minutes before serving.

Meanwhile, prepare sauce:

Bring 2 cups water to boil in heavy medium saucepan. Add tea bags. Remove from heat; cover and let steep 10 minutes. Discard tea bags. Add 1 cup orange juice and 3 tablespoons orange marmalade to tea. Boil mixture until reduced to 1 cups, about 12-15 minutes. Whisk in 1 tablespoon Dijon mustard and any reserved pan juices. Return to boil. Whisk in cornstarch mixture. Boil until sauce thickens slightly, about 4 minutes. Season sauce to taste with salt and pepper. Carve ham and serve with sauce.

Ham and Cabbage Soup

This soup makes use of the ham bone that is left over after a wonderful Easter dinner.  It is extremely hearty so perfect to chase away a chill, and based on very inexpensive ingredients, so inexpensive to boot!

Ham and Cabbage Soup

1 teaspoon olive oil
1 ham bone, left from Easter Ham (make sure to leave some meat on the bone)
1 cup onion, chopped
1 cup carrots, chopped
1 cup left over ham, chopped
4 cups cabbage, thinly sliced
2-3 cloves garlic, chopped
1 teaspoon salt
1/2 teaspoon pepper
1/4 teaspoon cayenne pepper
1.5 cartons chicken or vegetable stock (about 6 cups)
2 small sweet potatoes, peeled and chopped

Directions:
Heat oil in the bottom of a large dutch oven or soup pot.  Add onions, celery and garlic and cook for 3-4 minutes until starting to soften.  Add ham bone to the pot and brown on on all sides for 2-3 minutes.  Add chicken or vegetable stock.  Bring to a low boil, cover and simmer for about 1 hour.

Remove ham bone and pick any ham remaining on the bone.  Chop and add to the soup.  Add in cabbage, sweet potatoes and cut ham.  Return to a simmer and cook for about half an hour or until the cabbage is soft and wilted and the sweet potatoes are disintegrating a bit.

Serve in large bowls topped perhaps with a few homemade or store bought croutons!